Sunday, August 2, 2015

Robotech RPG Tactics


So I decided to finally start painting some of the Robotech RPG Tactics miniatures from the Battle Cry pledge I backed during the Kickstarter campaign. I am not too big of a fan of Robotech because I prefer the true anime Macross instead of the cut and paste job that is Robotech. If you've never seen Macross Frontier or Macross Zero, check them out for an awesome prequel story and sequel to the true Macross storyline. I won't go into too much detail over the disappointment many backers are having over the handling of this project but I am somewhere in between "These miniatures are a pain to assemble." and "These miniatures look pretty cool." and "Where is Wave 2?". First off these miniatures are small! I never realized how small the final product was going to be but they are darn small even for 1/285 scale. Compare it to a F-14 model from GHQ and you'll know what I am talking about. There is also many freaking little bits for one model! But if and when you get past that and actually get them assembled, they are kinda fun to paint.

I am still baffled how something this small can be almost 20 pieces unassembled.
I decided to start with my favorite pilot Max Jenius. I went with his classic VF-1A colors. I really want to paint the VF-1J version but I am still holding out(and hoping Palladium can deliver) on eventually getting the Wave 2 extra copies of the exclusive Rick Hunter model I ordered to paint them in those colors.
Two colors I try to avoid using most of the time is true white and true black. I usually go with light grey and dark grey for my whites and blacks. For this I primed with Vallejo Surface Primer Grey through my airbrush and then basecoated with Reaper Weathered Stone. I then took a 5/0 brush and lined the crevices with Warpaints Dark shade. I then highlighted with Reaper Leather White(My favorite White color) I left a little of the Weathered Stone showing just to get a nice highlighted effect. In the deepest areas I shaded with Reaper Stone Grey. For the blue I basecoated with Warpaints Crystal Blue and highlighted with Vallejo Andrea Blue. The deepest areas were shaded with Warpaints Blue Tone.
The canopy was painted with Warpaints Electric Blue(A new favorite color) and highlighted with P3 Frostbite.
The sky base was basecoated with Warpaints Electric Blue and the clouds were painted with a mixture of whites and greys mixed in with the base color.
This was a fun miniature to paint and I am already pumped up to tackle the Guardian Mode and Battloid Mode next. Hopefully I'll have enough miniatures assembled and painted so I can at least try the game once. Hopefully I'll get my Wave 2 stuff before this game loses popularity and gets discontinued or Palladium Books goes broke. We'll see how this play's out. Till then keep on painting!



Wednesday, May 27, 2015

Update and Pintrest

Once again, I am deciding to keep up with the blog and update it periodically. Now that school is over I need some motivation to get me painting again after a long hiatus. If you have noticed I updated the graphics on my page. I got into working with Adobe Illustrator recently and found it to be a fancier version of AutoCAD. I still have some improving to do but I figured the graphics were good enough for the blog. But anyways, we all want the minis. Here are some of my most current ones.


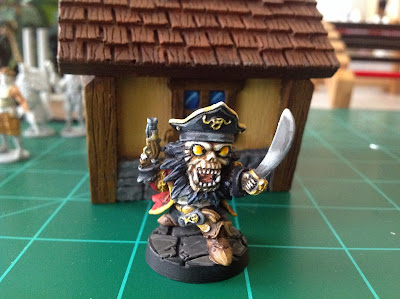
First up is Captain R. He was fun to paint. Decided to try a little NMM on the sword. 


Second up is the Royal Paladin from the first edition Super Dungeon Explore. My NMM still needs some refinement. So I decided to purchase a set of these for help:


I started to use them on some miniatures and so far the results have been really good. I'll update soon with a full review.
For those on Pintrest. I have a Pintrest board now. You can find me on my Miniart Design Pintrest. Lots of cool stuff to find and pin.

Well hopefully I can stay committed to writing occasionally. For anyone still reading this, thanks for sticking around and as always, Keep on gaming!

Saturday, July 5, 2014

Been a long time ;)

Hey all,
It's been a long time hasn't it? Well these days school is keeping me really busy. Whenever I can find the time to take a break from writing c++ code, I do some painting. Well my method was slow but it worked and I actually got a few miniatures painted. Check em out!

Starting with the Pumpkin Head from Impact miniatures


Next is a Blue Castle Crashers from Velvet Mark and also from Impact Miniatures


I also painted Candy and Cola the SDE version from Soda Pop Miniatures


Practicing some dark skin tones with the acrobat from Impact Miniatures


and finally finished off with Kisa SDE version from Soda Pop Miniatures


Well I hope to continue posting more as I get them done. Take care for now and keep on gaming!


Monday, July 22, 2013

1/285 Robotech scale buildings and a Chibi House

Hey everyone,
I've been neglecting my blog a bit but as far as doing hobby related projects, I've been ramping up constructive time on it. Over the past months I've been working on 2 big projects simultaneously. I took part in the Robotech RPG Tactics Kickstarter and after spending more money than I should my head started spinning with great ideas for terrain. My first terrain project for this game is a 1/285 scale gas station. It's pretty much done construction wise just needs some paint.


The whole project was constructed using a variety of Plastruct rods and sheets and all precisely cut using my new Chopper II from Northwest Short Line. This chopper is awesome!!! It was the perfect Father's Day present from my family. It's been getting so much use these past 2 months. If you don't have one, get one. You'll never use anything else so much for scratch building.


I also made a small scale Scott Bernard figure in cyclone armor. Not really useful for anything else but to get a sense of scale of the buildings at 1/285 scale. He might just end up being a statue at the gas station entrance.

so moving on to project number 2......


a Chibi House!! After seeing Scenery-Planet's awesome table I knew I had to make some of my own.


I'll post more of a write up on it but if you happen to frequent the forums at Impact Miniatures you'll see more info about it there under the chibi adventurers section. I know what you are thinking....I need one of those!! Well not to worry your little chibi gamer head....they are for sale at my etsy.com store located here-------------->https://www.etsy.com/listing/157446906/fantasy-gaming-chibi-house-kit?
so get one before they are gone.
So I got some catching up to do. Gotta post some miniatures and projects that I've been working on. So keep looking here for some updates soon. Till then....you know the drill ;)


Tuesday, April 23, 2013

MiniArt Store is launched tentatively!

If you noticed at the the side of my blog page there is a link to the MiniArt store. Not a lot being offered but if you want your own bases here is the place to get them. If it turns out to be successful, I might add more stuff. Again I am sorry I can't offer international orders. The logistics are too complicated at the moment, but I might investigate how to offer it in the future if there is interest. Here's a preview of what I have in stock:


and some painted examples


check it out and if you have any questions please let me know.
Keep on gaming!


Saturday, April 20, 2013

Hydra W.I.P.

Well I know it's been a few months but I have been busy getting stuff done. Just want to post my hydra from Impact Miniatures. I am enjoying painting this. I'll do a more detailed write up once I am done with it. 


Anyone planning on going to CMON Expo, I'll be there. Let me know if you are going as well and we can meet up.
Keep on gaming!

Friday, January 11, 2013

How to build your own X-Wing Miniatures Senator Shuttle

My first almost completed project for the beginning of the year is a Senator's Shuttle for use in the X-wing Miniatures game. If you buy the core box you receive a card board card with a picture of the shuttle on it to use. Well that won't do. I like to represent objectives for games in 3 dimensions not 2. So I got out my tools and got to work.


After some playing around with the shape here is the finished product. It's mostly made from square styrene rod glued together to build the shape of the shuttle. I used 1/2 round styrene and flat plastic strips to add detail to the ship. The engines and the front of the ship are some blocks from the machine builder mold from Hirst-Arts. I cast the pieces in urethane plastic for durability. While I like the result, I figured there's got to be a better and easier way to build this. After looking at some pieces from the machine builder mold I found a way to quickly build a Senator's Shuttle and even create a whole fleet of them if you like.  


So unfortunately for this tutorial you will need to own, or borrow Industrial Accessory Mold #326 and the Machinery Builder Mold #327 found here. If you have never used Hirst-Arts, I totally recommend all of Bruce's product lines of molds he has to offer. The quality of the molds themselves is mind blowing and the detail is amazing. I currently own about 20 molds and use them for a lot of my hobby projects. But if you don't want to spend the money, there are a bunch of licensed vendors who sell casts of most of the mold lines. So you'll need the following pieces in the photo.


To make it a bit easier I labeled which pieces come from which mold. Unfortunately you will need to cast mold 327 six times to get the bottom pieces since they only get cast 2 at a time. 


So now it's just a matter of gluing the pieces together in the following fashion to make the essential pieces of the Senator's ship. The pieces that make up the engines are supposed to be chemical containers and have a tiny skull in the center of the diamond. I just take an x-acto knife and scrape it off, but if you want you can leave it on. 


Then it's a matter of gluing all the pieces together and done and done. So this new version is pretty simple to make. I think I glued it together in 10 minutes. Casting the pieces took way longer. But while you could use this ship as is, you can take it a bit further and add some more details to give it more of the Star Wars aesthetic.


All I did was cut up some styrene half rod and smaller styrene rod and glued it to the hull. Now it has a bit more detail and looks more Star Wars like. The awesome part is that the pieces from the Hirst-Arts molds give it most of the detail so you don't really have to do much after. 


A little paint and it will be ready to hit the table. So there you have it. Not much of a tutorial but I tried to simplify the process to make it possible for people who don't have much modeling experience can build one easily. So one project off to a start and it is still January! This might be the year of the hobbies yet ;). Any questions feel free to ask and as always....Keep on gaming!