Thursday, October 8, 2015

Arcadia Quest- Sonja

Well after 2 months of working on my last project, I decided to continue working on a few Arcadia Quest miniatures. Lately I've been all over the place as far as painting miniatures. Since I have a dedicated hobby area, I leave about 4 different miniatures on my desk and work on them as I have the desire. I find this works for me since I get bored painting one miniature for hours on end. It may not be the best strategy to completing a miniature but it's refreshing having a variety of different canvases to pick from. Also I'm in no hurry to have all my miniatures fully painted :).
So here is Sonja from Arcadia Quest. I pledged to the Arcadia Quest Kickstarter and got a really great deal on some nicely sculpted miniatures. While I did get a Sonja with my pledge, this one was actually from a painting Chibi eye class taught by Elizabeth Beckley at the Cmon Expo this past year. The class itself was very informative. I also took Jessica Rich's blending skin class which totally changed my perspective on painting skin. 


I started painting the skin by using Reaper tanned shadow and blended up to Reaper tanned skin. Next I picked out the raised edges of the skin and blended in Reaper tan highlight. The raised cheek bones got a light glaze of pink. I still need some practice on the technique but so far I am very pleased with the results.


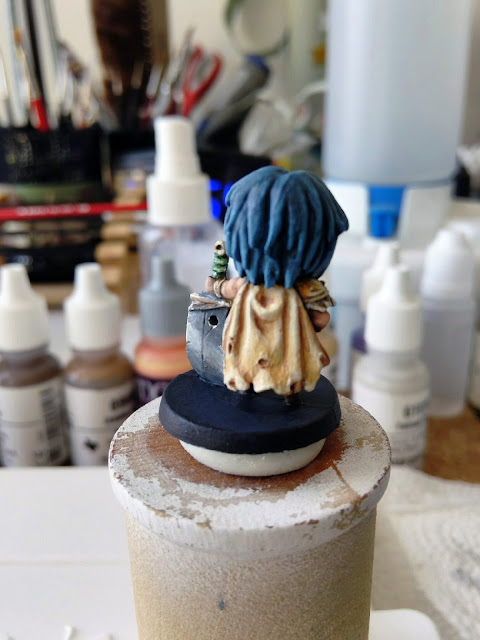
The back of the miniature is not too exciting. I just used P3 Rucksack Tan as a base, blended with P3 Menoth White Base, and highlighted the raised edges with P3 Menoth White Highlight. 
I am very pleased with how it turned out and I love the quality of the Arcadia Quest miniatures. I am looking forward to the next expansion Arcadia Quest Inferno coming to Kickstarter next month. 
Nothing like adding more miniatures to my ever growing collection :).
Till next time..

Friday, October 2, 2015

Lifeguard House- Take 2

So one thing I enjoy doing is building scale models. It was a dream of mine since I was young that I wanted to grow up and build architectural models for a living. I loved seeing those scale models displayed for the public before they would build some new skyscraper or shopping center. They always gave you an exact idea of how something was going to look and you can interact with it in ways that you just couldn't with 2D drawings. 
Some of the best models I saw was when I worked at Disneyland in Anaheim, CA and they were showing the concept models before they built California Adventure. I would spend a couple hours after my shift gazing at the huge master planned model for the new park and the various attractions. Some of them actually were working scale models that moved. It's amazing to see these tiny things get built into human scale structures.

Well my dream of getting a job with the Disney Imagineers never came true. I got as far as submitting a resume(numerous times) but never got a call back to interview :(. But I still enjoy building scale models for fun. I recently got contacted by a reader of my blog who wanted a lifeguard house model like the one I built awhile ago to use as a trophy for the winner of their fantasy football league. The model will get passed around every year between winners, so durability is a must. He gave me a few ideas of what he wanted so I got to working on it right away. He really wanted it to resemble the ones in Hermosa Beach, CA which are pretty neat looking as far as lifeguard houses go. They are bright and colorful which in miniature painting could be quite challenging to pull off without careful attention to paint thickness. The biggest of those challenges is making the colors pop while still maintaining opacity and then without making it look like you layered globs of paint on the model. So I had to utilize numerous thinned layers of colors on the house. Very time consuming to say the least. The end result looks great though. The bane of all paint colors has got to be the color yellow. You can paint on 5 layers of this color and it still will look pretty drab. One work around I used was P3 Menoth White Base which is very opaque, and then glaze on layers of P3 Sulfric Yellow. By the way, P3 paints continue to be some of the best paints to use on miniatures. I really wish they would extend the paint line and add more color tones though.  
I decided to keep it simple with the lifeguard house so I avoided the overuse of highlights and shadows which I normally incorporate in most of my miniature figures. I wanted the lifeguard house to be the centerpiece and the focal point with only the bright solid colors and shapes being what draws your eyes in.


I added a lot of small details like mini sea shells and a trash can with various sporting equipment thrown in. Sounds weird I know. The idea behind it was an inside joke a friend of mine said once. "When football season starts, every other sport goes in the garbage." I researched what LA County beaches trash cans look like and I even found a sticker / slogan they put on them as well. All the lifeguard houses have an address painted on the side to indicate what street it's on. I went with 15 St. because that is the one my client had fond memories of.


This is actually one of the signs they have at one of the lifeguard houses. I copied and altered its size in Photoshop and printed it to a label, glued to plastic card and varnished the heck out of it. The Lifeguard on Duty sign on the front of the house was made in the same way.  You can see that sign better below. I used a bit of artistic license on this just for aesthetics.


I used the Hirst Arts wood plank mold to make the Hermosa Beach sign. Originally it was made from plastic card strips scored with a knife to make it look like wood grain but then it looked too much like a fence than a sign. After painting the wood grain on the platform, I was tired of painting faux wood grain so I made the switch. Hirst Art blocks are great because you can just basecoat and dry brush the pieces and they end up looking like you spent hours on it. Most people usually cast Hirst Art blocks with dental plaster. I cast these in urethane plastic instead because I wanted to have the durability and no risk of it getting shattered with all the handling it will get between fantasy football winners. The letters I bought at Hobby Lobby and are laser cut scrapbook letters.


The surfer girl is lounging on a towel and using a small tablet device. I don't know if people usually lounge around in their wet suits after surfing but I figured she was taking a break before going out on the waves again.


The towel was made from Apoxie Sculpt and hand painted with Hawaiian flowers. The extra surfboard was made from green stuff, and the football was made from Apoxie Sculpt. I know that college regulation footballs are the ones with stripes on the sides, but when your 6 year old asks "Why is there doodie on the beach?" you are forced to make the change so there is no confusion on what it's supposed to be. The surfer/lifeguard is from Reaper Miniatures and the surfer girl is from Hassle Free miniatures.

It was a fun project and took 2 long months from concept to completion. Hopefully my client and his friends will enjoy passing around this trophy for years to come.
I normally don't take commissions( I am too much of a perfectionist) but if it's something I am confident I can do well, I will consider the request.
Till next time,
Keep on Painting!

Sunday, August 2, 2015

Robotech RPG Tactics


So I decided to finally start painting some of the Robotech RPG Tactics miniatures from the Battle Cry pledge I backed during the Kickstarter campaign. I am not too big of a fan of Robotech because I prefer the true anime Macross instead of the cut and paste job that is Robotech. If you've never seen Macross Frontier or Macross Zero, check them out for an awesome prequel story and sequel to the true Macross storyline. I won't go into too much detail over the disappointment many backers are having over the handling of this project but I am somewhere in between "These miniatures are a pain to assemble." and "These miniatures look pretty cool." and "Where is Wave 2?". First off these miniatures are small! I never realized how small the final product was going to be but they are darn small even for 1/285 scale. Compare it to a F-14 model from GHQ and you'll know what I am talking about. There is also many freaking little bits for one model! But if and when you get past that and actually get them assembled, they are kinda fun to paint.

I am still baffled how something this small can be almost 20 pieces unassembled.
I decided to start with my favorite pilot Max Jenius. I went with his classic VF-1A colors. I really want to paint the VF-1J version but I am still holding out(and hoping Palladium can deliver) on eventually getting the Wave 2 extra copies of the exclusive Rick Hunter model I ordered to paint them in those colors.
Two colors I try to avoid using most of the time is true white and true black. I usually go with light grey and dark grey for my whites and blacks. For this I primed with Vallejo Surface Primer Grey through my airbrush and then basecoated with Reaper Weathered Stone. I then took a 5/0 brush and lined the crevices with Warpaints Dark shade. I then highlighted with Reaper Leather White(My favorite White color) I left a little of the Weathered Stone showing just to get a nice highlighted effect. In the deepest areas I shaded with Reaper Stone Grey. For the blue I basecoated with Warpaints Crystal Blue and highlighted with Vallejo Andrea Blue. The deepest areas were shaded with Warpaints Blue Tone.
The canopy was painted with Warpaints Electric Blue(A new favorite color) and highlighted with P3 Frostbite.
The sky base was basecoated with Warpaints Electric Blue and the clouds were painted with a mixture of whites and greys mixed in with the base color.
This was a fun miniature to paint and I am already pumped up to tackle the Guardian Mode and Battloid Mode next. Hopefully I'll have enough miniatures assembled and painted so I can at least try the game once. Hopefully I'll get my Wave 2 stuff before this game loses popularity and gets discontinued or Palladium Books goes broke. We'll see how this play's out. Till then keep on painting!


Wednesday, May 27, 2015

Update and Pintrest

Once again, I am deciding to keep up with the blog and update it periodically. Now that school is over I need some motivation to get me painting again after a long hiatus. If you have noticed I updated the graphics on my page. I got into working with Adobe Illustrator recently and found it to be a fancier version of AutoCAD. I still have some improving to do but I figured the graphics were good enough for the blog. But anyways, we all want the minis. Here are some of my most current ones.


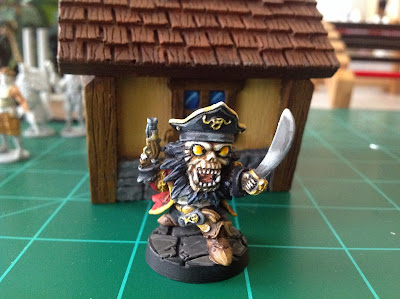
First up is Captain R. He was fun to paint. Decided to try a little NMM on the sword. 


Second up is the Royal Paladin from the first edition Super Dungeon Explore. My NMM still needs some refinement. So I decided to purchase a set of these for help:


I started to use them on some miniatures and so far the results have been really good. I'll update soon with a full review.
For those on Pintrest. I have a Pintrest board now. You can find me on my Miniart Design Pintrest. Lots of cool stuff to find and pin.

Well hopefully I can stay committed to writing occasionally. For anyone still reading this, thanks for sticking around and as always, Keep on gaming!